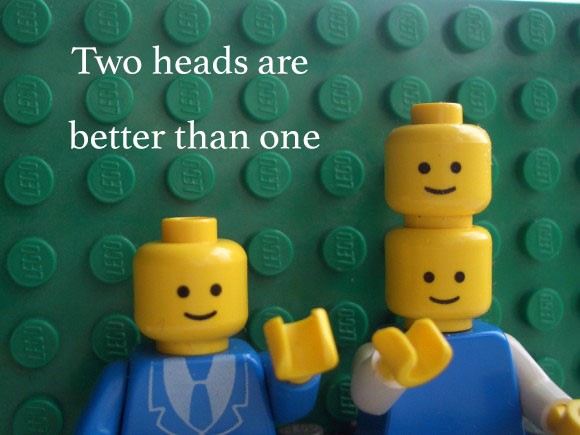
Strategies for collaborative learning
Collaborative learning refers to “learning activities expressly designed for and carried out through pairs or small interactive groups.”
Smith B. L., and MacGregor J. T. in their article What is Collaborative Learning? said that “collaborative learning” is an umbrella term for a variety of educational approaches involving joint intellectual effort by students, or students and teachers together. Usually, students are working in groups of two or more, mutually searching for understanding, solutions, or meanings, or creating a product. Collaborative learning activities vary widely, but most center on students’ exploration or application of the course material, not simply the teacher’s presentation or explication of it.
Many learning activities are collaborative in nature. Some activities are intentionally designed to engage students collaboratively in meaningful learning to accomplish desired educational outcomes. Collaborative learning can be a very creative process, while also building team skills and appreciation for the talents individual students bring to the activity.
Some collaborative learning activities are:
- Case Method
- Coached Problem Solving
- G+ Hangouts
- Guided Discovery Problems
- Online Forum Discussion
- Peer Assessment
- Problem-Based Learning
- Project-Based Learning
- Role-Playing
- Send-A-Problem
- Team-Based Problem Solving
- Think-Pair-Share
To make collaboration learning successful, teachers must prepare for this process. Miriam Clifford submit some tips and strategies for collaborative learning:
- Establish group goals.
- This keeps the group on task and establishes an unambiguous purpose. Before beginning an assignment, it is best to define goals and objectives to save time.
- Keep groups midsized.
- Small groups of 3 or less lack enough diversity and may not allow divergent thinking to occur. Groups that are too large create “freeloading” where not all members participate. A moderate size group of 4-5 is ideal.
- Establish flexible group norms.
- Collaborative learning is influenced by the quality of interactions. Interactivity and negotiation are important in group learning. If you notice a deviant norm, you can do two things: rotate group members or assist in using outside information to develop a new norm. It is best to have flexible norms. Norms should change with situations so that groups do not become rigid and intolerant or develop sub-groups.
- Build trust and promote open communication.
- Successful interpersonal communication must exist in teams. Building trust is essential. Deal with emotional issues that arise immediately and any interpersonal problems before moving on. Assignments should encourage team members to explain concepts thoroughly to each other. Studies found that students who provide and receive intricate explanations gain most from collaborative learning. Open communication is key.
- For larger tasks, create group roles.
- Decomposing a difficult task into parts to saves time. You can then assign different roles. The students might have turns to choose their own role and alternate roles by sections of the assignment or classes.
- Create a pre-test and post-test.
- A good way to ensure the group learns together would be to engage in a pre and post-test. In fact, many researchers use this method to see if groups are learning. An assessment gives the team a goal to work towards and ensures learning is a priority. It also allows instructors to gauge the effectiveness of the group.
- Consider the learning process itself as part of assessment.
- Experts have argued that the social and psychological effect on self-esteem and personal development are just as important as the learning itself.
- Consider using different strategies, like the Jigsaw technique.
- This type of collaboration allows students to become “experts” in their assigned topic. Students then return to their primary group to educate others.
- Allow groups to reduce anxiety.
- Allow groups to use some stress-reducing strategies as long as they stay on task.
- Establish group interactions.
- The quality of discussions is a predictor of the achievement of the group. Instructors should provide a model of how a successful group functions. Shared leadership is best. Students should work together on the task and maintenance functions of a group. Roles are important in group development. Task functions include:
- Initiating Discussions
- Clarifying points
- Summarizing
- Challenging assumptions/devil’s advocate
- Providing or researching information
- Reaching a consensus.
- The quality of discussions is a predictor of the achievement of the group. Instructors should provide a model of how a successful group functions. Shared leadership is best. Students should work together on the task and maintenance functions of a group. Roles are important in group development. Task functions include:
- Use a real world problems.
- real world problems can be used to facilitate project-based learning and often have the right scope for collaborative learning.
- Focus on enhancing problem-solving and critical thinking skills.
- Design assignments that allow space for varied interpretations. Different types of problems might focus on categorizing, planning, taking multiple perspectives, or forming solutions. Try to use a step-by step procedure for problem solving. Problem-solving procedure could be:
- Identify the objective
- Set criteria or goals
- Gather data
- Generate options or courses of action
- Evaluate the options using data and objectives
- Reach a decision
- Implement the decision.
- Design assignments that allow space for varied interpretations. Different types of problems might focus on categorizing, planning, taking multiple perspectives, or forming solutions. Try to use a step-by step procedure for problem solving. Problem-solving procedure could be:
- Keep in mind the diversity of groups.
- Mixed groups that include a range of talents, backgrounds, cultures, learning styles, ideas, and experiences are best. Studies have found that mixed aptitude groups tend to learn more from each other and increase achievement of low performers. Rotate groups so students have a chance to learn from others.
- Groups with an equal number of boys and girls are best.
- Equally balanced gender groups were found to be most effective. You may also want to specifically discuss or establish gender equality as a norm.
- Diminished responsibility as students begin to understand concepts.
- Allow groups to grow in responsibility as times goes on. In your classroom, this may mean allowing teams to develop their own topics or products as time goes on. After all, increased responsibility over learning is a goal in collaborative learning.
- Include different types of learning scenarios.
- Collaborative learning that focuses on rich contexts and challenging questions produces higher order reasoning. Assignments can include study teams, debates, writing projects, problem solving, collaborative writing ant others.
- Technology makes collaborative learning easier.
- Collaboration had the same results via technology as in person, increased learning opportunities. Be aware that some research suggests that more exchanges related to planning rather than challenging viewpoints occurred more frequently through online interactions. This may be because the research used students that did not know one another. If this is your scenario, you may want to start by having students get to know each other’s backgrounds and ideas beforehand on a blog or chat-board.
- Individual time.
- You may allow some individual time to write notes before the groups begin. This may be a great way to assess an individual grade.
- Be wary of “group think”.
- While collaborative learning is a great tool, it is always important to consider a balanced approach.
- Value diversity.
- Students need to respect and appreciate each other’s viewpoints for it to work. Create a classroom environment that encourages independent thinking.
http://www.teachthought.com/pedagogy/20-collaborative-learning-tips-and-strategies/
The jigsaw strategy is said to improve social interactions in learning and support diversity. The workplace is often like a jigsaw. It involves separating an assignment into subtasks, where individuals research their assigned area. Students with the same topic from different groups might meet together to discuss ideas between groups.
Selecting ICT tools to design activities online
Moodle tools – Workshop – design for active collaboration. This is a powerful peer (and self) assessment activity.
Setting up your workshop:
- In the course where you want your workshop, turn on the editing and from the Activity Chooser, select ‘Workshop’.
- Give it a name and a description telling students what the workshop is about.
- Clicking the question mark icon
 next to any setting you don’t understand will display extra help.
 - If you’re not sure about the Grading settings, leave them as default. Students get two grades – one for the work they submit and one for the quality of their peer assessments. You can change the default 80% and 20% if you wish and you can also set passing grades for both scores. It is usually only the students who do the assessing, although you as a teacher can assess too, and you can change individual student grades later on if you think it is necessary.
- The Submission settings is where you tell them what they must do for this task. They can type directly into Moodle or upload one or more files. You can let them submit late if you wish and you can specify which file types they are allowed to upload.
- The Assessment settings is where you tell them briefly what they are looking for when assessing the work of their peers. Don’t give detailed instructions because this will be done later. You can let them assess their own work too, based on the more detailed criteria you will add later.
- Feedback will give the students the option of typing in some free text comments when they peer assess. You can make this optional, required or turn it off. They may also upload files as feedback, and you can specify which file types they may add. You can also add a conclusion to the workshop which will display when it is over.
- You might find it useful to give your students one or more Example submissions to practise on first. If you do, you can make them optional or required. You can force them to practise on any example submissions before they upload their own or afterwards before they do the peer-assessments.
- Think about whether, in the Availability section, you want the students to be given submissions to assess automatically once the submission deadline is over.
Workshop phases
Once saved, you will see the Workshop displayed like this:
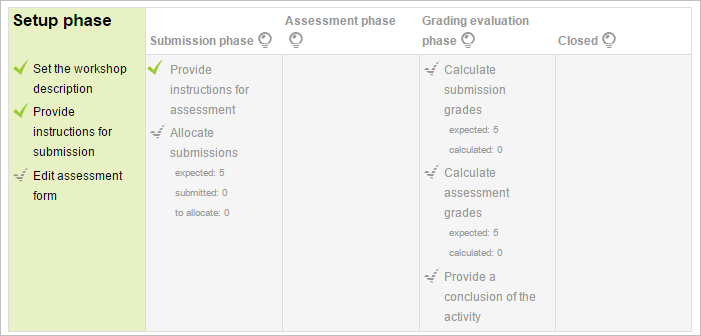
A workshop moves between different phases. You can automate some phases and (if needed) you can move back a phase. You as teacher switch phases when you are ready by clicking the light bulb icon. The Setup phase will be highlighted because it’s the phase you are in when you have just created the workshop.
Setup phase
- Click ‘Edit assessment form’ to provide detailed grading criteria for your students to use. When finished, click ‘Save and close’, and all ticks on the Setup phase will be the same colour.
- You are ready to switch to the Submission phase which lets students send in their work. Click the lightbulb at the top of Submission phase. This phase will be highlighted.
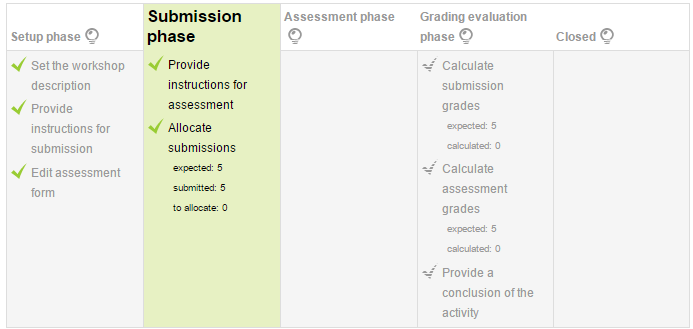
Submission phase
- Students will now be able to submit their work during this time, until any deadline you specified – unless you also allowed late submissions.
- Click the link ‘Allocate submissions’ to decide if you yourself want to choose which student assesses whose work (Manual allocation), or if you want Moodle to choose for you (Random allocation) And do you want students to assess others’ work even if they have not submitted anything themselves?
- If in the Availability section you set the workshop to switch to the submission phase automatically once the submission deadline is over, choose Scheduled allocation.
- You can see how many have submitted and how many still need to submit. Click the lightbulb icon to move to the Assessment phase if you chose to switch phases yourself. The phase will be highlighted. (Remember that you can move back a phase if you need to, for example if you want to allow a student to resubmit.)
Assessment phase
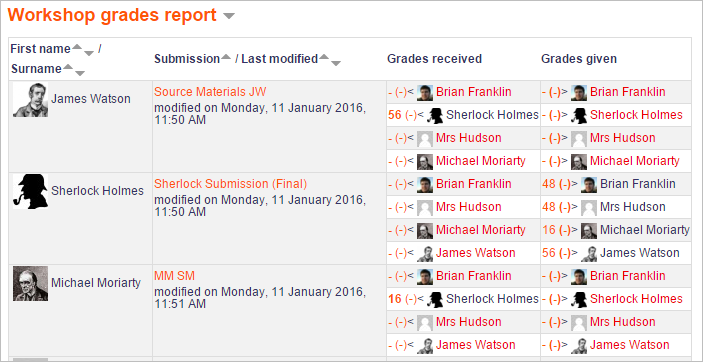
- Students will assess the work of their peers according to the instructions and criteria you gave them.
- You can monitor their progress by looking at the grades underneath the phases screen:
- When you are ready, click the lightbulb to move to the Grading evaluation phase. This phase will be highlighted.
Grading evaluation phase
- Here, Moodle calculates the final grades for submission and for assessment. The page Using Workshop gives more details on how the grading works.
- For the grade for assessment, you can decide how strict you want the comparison to be. If you are not sure, leave it as the default ‘fair’.
- You can recalcuate the grades several times.
- You as teacher can change grades here if you need to.
Publish submissions: You can show to other students selected submissions if you wish. Click on a submission in the workshop grades report and scroll down to ‘Feedback for the author’. Tick the box to publish this submission. Other students will see it once the workshop is closed.
Closing the workshop
When you are satisfied with the final grading, click the lightbulb icon to close the workshop. The Closed phase will be highlighted and students will be able to see their grades, any published submissions and a conclusion if you added one.
References:
- Barbara Leigh Smith and Jean T. MacGregor What is Collaborative Learning? (1992) Nacional Center on Postsecondary teaching, learning, and Assessment. 9-22.
- Clifford M. Collaborative Learning Tips And Strategies For Teachers. 2011. http://www.teachthought.com/pedagogy/20-collaborative-learning-tips-and-strategies/
- Workshop quick guide: https://docs.moodle.org/32/en/Workshop_quick_guide
![]() Online workshops as an active way to collaborate by Kristijonas Jakubsonas is licensed under a Creative Commons Attribution-NonCommercial-ShareAlike 4.0 International License.
Online workshops as an active way to collaborate by Kristijonas Jakubsonas is licensed under a Creative Commons Attribution-NonCommercial-ShareAlike 4.0 International License.
 This project has been funded by Erasmus + programme of the European Union. This web site reflects the views only of the authors, and the Commission cannot be held responsible for any use which may be made of the information contained therein.